MyNCC Text Message Notification
Text Message Notification when MyNCC Email is Received
1. In your Internet Browser (Mozilla Firefox, Internet Explorer, Google Chrome, Opera, Safari, etc.) Login to the MyNCC Portal.

2. On the top left navigation menu you'll see an area called "Launch Pad". Click the Mail Icon to access MyNCC Student E-Mail.
![]()
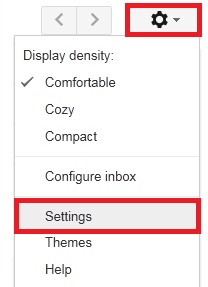
3. On the top right click the "Wheel" or "Gear" icon, then Click the "Settings" link.

4. Open your Settings panel in Gmail, and then click on the "Forwarding and POP/IMAP" tab.

5. Click "Add a forwarding address" button.

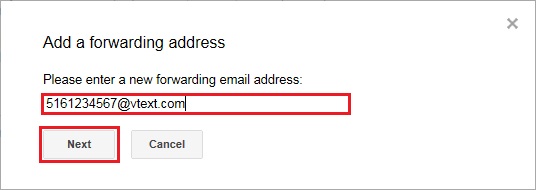
6. Enter a ten digit cell phone number with the corresponding carrier extension (see below), then click the "Next" button.

7. Verify the phone number is correct and click the "Proceed" button.

8. Click "OK" to send the confirmation code to the telephone number you typed in above.

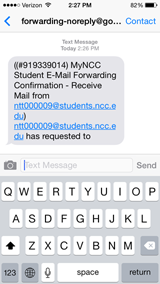
9. Below is a sample text message verification code, the nine numbers after the "#"
10. Type the verification code from the text message and click the "Verify" button.
![]()
11. A prompt will appear telling you the forwarding was setup successfully.
![]()
12. Below is what you should see after the forwarding has been setup.

The e-mail address will be the cell phone number followed by the carrier extension. An example email address would be 8565551111@vtext.com for cell phone number 856-555-1111 with Verizon Wireless as a service provider. Some of the more popular cell phone carrier extensions are listed below.
AllTel: (cell#)@message.alltel.com
AT&T: (cell#) @txt.att.net
Cingular: (cell#)@mycingular.com
Nextel: (cell#)@messaging.nextel.com
T-Mobile: (cell#)@tmomail.net
Sprint: (cell#)@messaging.sprintpcs.com
Tracfone: (cell#)@cingularme.com
Verizon Wireless: (cell#)@vtext.com
The next time you receive an email from Nassau Community College a text message will be sent to your cell phone notifying you. Please Note: Text messaging charges may apply depending on the recipient's cell phone plan. Please check with your cell phone provider.
Disable Text Message Notification
1. Click the drop down arrow and select "Remove: XXX-XXX-XXXX (in use)".

2. A popup box will ask you to confirm, click "OK".

3. A successful remove message will be shown at the top of the page.
![]()


